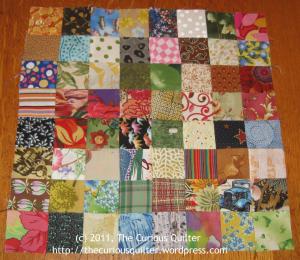
One finished 12.5 by 12.5 inch block down, eighty to go!
I do love scrappy quilts, and my postage stamp quilts are among my favorites. Most of you know this, and some of you share my obsession. My two-inch treasures have been well discussed here, some have been sold on ebay®, and several of my readers are making their own scrappy little treasures into quilts. Hop over to Colorado Lady to see her progress on a postage stamp scrappy quilt. Then peek at Lemonwood Clock for another. There are lots of inspiring links on the Lots of Links page. I know of nearly a dozen readers who have started a Postage Stamp Quilt.
Some people look at them and think they are intimidating, but to me they really are one of the simplest quilts you can make. But they can get tedious. The cutting is straightforward, the seams are simple, there is practically no planning for color or design placement. In my humble opinion, some wacky corners in your matching are quite acceptable on these, unless you are entering a contest. The finished quilts are colorful and busy enough to hide flaws. That said, perfectionists can make all their corners as tidy as they want! I am definitely not a perfectionist.

Look around my blog to find more photos of this and other Postage Stamp Quilts.
They are like a giant I-Spy quilt, with novelties and so many interesting fabrics in them. We have kept little ones entertained at family gatherings, asking them to go count the purple squares, or find how many cats or butterflies they can find. Having finished five of them, ranging from double to king bed size, I am now starting on my sixth. Slowly, no rush, just doing a few blocks every now and then.
This is one of those quilts that can be assembled in more than one way, and none of them are right or wrong. If super-scrappy is not your style, you can sort your pieces and create a color-washed pattern. Some people advocate stitching together rows of eight little squares, then attaching the next row, etc. I use the same “squares, rectangles, squares” technique that was used with ten squares in the Classic Squares Quilt Tutorial, and that is what I am demonstrating here.
Love these quilts? Join the 2012 Postage Stamp Quilts Charm Swaps & Challenge; fun events and swaps all year.
And I am talking scrappy here. This quilt will use over 4,000 two-inch squares of fabric, and I aim for as few duplicate fabrics as possible. Frankly, you could probably duplicate each fabric three or four times and many people would never notice it. But having no repeats makes for a fun challenge! You could start with squares as big as 2.5 inches, or even go tiny and start with the classic one-inch fabric squares. Two-inchers just feel manageable to me, but still give the mosaic effect. If you love the look, but have a limited fabric supply or limited patience, consider strip-piecing a quilt using 10 to 50 different fabrics. You can find good directions for strip-piecing a postage stamp quilt at
Seams To Be You and Me.
How I Assemble One 12.5 Inch Postage Stamp Quilt Block
Click any photo to enlarge. This is the same process as shown in the Classic Squares Quilt Tutorial, which is on a much larger scale.
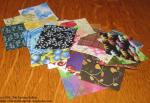 1. I pulled 65 squares out of the large bag of pieces. This gives me one extra in case I pull a duplicate. |
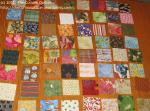 2. Then I lay out a set of 64, 8 squares in each direction. I set aside the extra square. The ONLY adjusting I do is to turn novelties and stripes so they all face in different, random directions. I do not want an UP and DOWN sense to my quilt. |
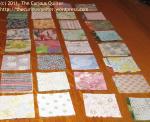 3. I pair them up for stitching, right sides together, keeping the novelties and stripes in the direction I picked. |
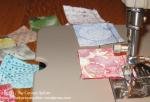 4. Keeping the pieces in the same direction as I had laid them out, I stitch a scant 1/4 inch seam, chaining them all together. |
 5. I press the seams to one side, alternating direction. Dark and light does NOT matter! |
 6. I randomly lay these rectangles out, so the seam allowances go in opposite directions. |
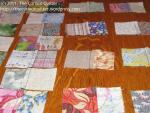 7. I pair these up, right sides together. Perfectionist may want to pin, but I never do! |
 8. Then I chain these together, matching the seams. |
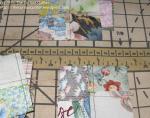 9. I press these seam allowances all in the same direction. Consistency in pressing will make all the blocks go together easily as you sew your quilt. |
 10. Now my rectangles are squares again. I lay them out in rows, with the long seams in each square going in opposite directions each row. Click to enlarge. |
Note to perfectionists! You may want to square these up to 3.5 inches before proceeding, to help keep all corners matching. |
 11. I pair these squares up and lay right sides facing, so the seams match in opposite directions. I stitch these together in chains. |
 12. After pressing those seams to one side, I lay out these 8 rectangles, pairing them so their center seams go in opposite directions. |
 13. Again, I pair these up, right sides together, and stitch them together. I never pin, but suspect most people would! |
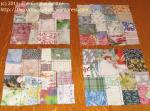 14. After I press the seams to one side, I have 4 squares. I lay them out so the long seams are going in opposite directions. |
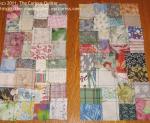 15. I paired the four squares up, right sides together, and stitched them into two large rectangles. Just one more seam, and my block will be done! |
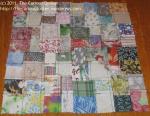 16. So I pair up the last pair of rectangles, and finish my final square. I press it thoroughly, then set it aside. Before I sew my final blocks together into a quilt, I will square them to a uniform 12.5 inches. |
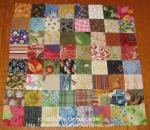 My finished block. Notice that, since I was careful with the direction of the first pairings, my stripes and novelties all face in different, random directions. Even though I shifted the pieces around, the variety of directions was preserved. |
A year ago, I had over 40,000 little squares cut (OK, way over, I re-estimate it at 75,000). I have used some, but I can’t stop cutting as I acquire other fabrics. Take a look here, it really is an obsession! However, I hope that you will be inspired to try making a scrappy postage stamp quilt sometime! Let me know if you do, I would love to share your progress with others too. – Mary


©2011, The Curious Quilter, thecuriousquilter.net, maryeoriginals.com.
About thecuriousquilter
Quilter, sewer, writer, gardener, mom & gramma, sister, friend, always learning, always curious.

![]()


Yippee! You are back on track!
I may do this yet. I like your non-pinning way. I hate pinning.
I will have to try this instead of the rows of eight. I probably will use pins, not bring as brave as you, but I can see that there would be less pinning needed this way!
Thanks for sharing.
LOL I had to do a double take, because your first picture resembles a block I have on my ironing board right now. I piece the same way you do – but I make mine much smaller – for small quilts to donate to a local animal shelter. I must admit I’ve been “blocked” for a while (pun intended) but you’ve made me want to get back to work.
I started working on my very first postage stamp quilt earlier this week and even if I’m not even halfway I plan to do another one! The one I’m working on is a bit planned using different shades of yellow, green and brown, but I think the next one will be to use up my scraps. Love yours! 🙂
Pingback: Postage Stamp Quilt Progress « Lemonwood Clock
Pingback: » Cutting fabric… - L & R Designs Quilting -
Pingback: Postage Stamp Quilt 2012: Mini-Challenge Number One Begins | The Curious Quilter
What are the outside dimensions of the whole quilt
The quilt shown on the glider is 8 feet by 8 feet, but you can make them any size you like! The block demonstrated here, when made with 2″ charms, is 12.5 inches. Again, you can make them with any size charm. Check out the chart in the Postage Stamp Quilt 2012 – Charm Swap Number One post to see how many charms needed for various size quilts!
I have been collecting 2-1/2″ squares for years. after I finish a quilt project, I cut down all my scraps and have them neatly stored in boxes. I have almost given them away a number of times…..but just couldn’t part with them. I see a quilt in my future, I just needed to hear that it didn’t have to be planned out. Thanks for the information.
I hope you will join the April swap!
I have completed my challenge (yay!!) but now I am trying to decide how to square them up. Is the recommendation to make sure they are squared from the seam, or that they’re all just the same size. Some of mine look kind of crazy!!
Ok, different question: I started trimming from the seam, with the assumption that I’d be leaving 1/4″ for the future seams. But some of my squares are too small, either from sloppy cutting originally or from sloppy sewing… So that I’m left with only 1/8″ for a seam. Should I cut them all down to match that, and just have smaller sqaures, and probably a smaller quilt, or should I risk sewing an 1/8″ seam? Hopefully that’s not too wordy and confusing lol.
I would center the smaller square and use it as long as you can get a 1/8″ or better seam. Press well, the final quilting should stabilize it.
As far as squaring up…
In my PSQ block demo, I suggest squaring each 4 patch to true 3.5″ ONLY IF you want precision. I trim each 12.5″ block. Yes, that sometimes means I have whacky edges on each block, but these quilts are so ‘busy’ that only you or another quilter will see it.
So, if you care about the quilt police, if you are a perfectionist, if slight wackiness bothers you . . . Square every four patch. Otherwise square every 12.5″ block.
Thanks!! That helps so much!
Pingback: » I did a PSQ block! - L & R Designs Quilting -
Pingback: » Design Wall Monday – PSQ start! - L & R Designs Quilting -
Are we allowed to copy your instructions? If so, do you have “printer friendly” instructions so that all the excess isn’t printed, like the stuff on the right and all the comments? If you would like to email me directly, I’d appreciate it.
This quilt is beautiful and I’d like to try one!
Thank you.
If you want to print a copy for your personal use, that is quite alright. Please do not print it for publication, or to share with others, as that is a copyright violation.
When printing a web page, you can select “Print Background” or not to print it on your printer preferences, found usually when you select Print, then see the “Preferences” button. Alternately, if you go FILE, PAGE SETUP, you can select whether or not to print “background images”. That will cut out most of the sidebar info.
Start cutting to share, there will be a swap or two in 2012 as well!
– Mary
Oh, thank you so much! That worked well and rest assured, it’s only for me. I’ve heard about these quilts, but have never seen one. The picture you show makes me want to hurry up and get started…it’s WONDERFUL!!!
Hi Mary,
Deanna Treadway linked me to your site.
I also am an avid postage stamp quilter :+) and had no idea there were others like me with this passion :+); my friends think I am obsessed, which I hate to admit but perhaps a little – haha! All my quilts are 1.5″ cut and 1″ finished. I also like to do ‘back art’ by taking part of the pattern from the front and doing it in 2″ (finished) squares on the back. Yes, I’ve created 1.5″ designs to give my quilts some structure – sort of. Perhaps it is just the Virgo in me :+))))) I thought it would help me use up some of my endless stash but no matter how much I use, my piles do not seem to diminish. It does eliminate having to deal with a lot of yardage on the back though. I would love to share some photos of my postage stamp quilts with you but do not know how to so this. I am so very happy to find this site!
Rosemary
Email me please! My address is on the contact page. I am traveling for a couple if days and may not respond right away.
A little 97 yr old man from my church quilts and made a queen size one…beautiful!!!
I love to try making these Quilts, some times I get upset and stop.
What upsets you about them? Perhaps the collective group of PSQ quilt lovers can offer some suggestions or help?
Hopefully, you aren’t worried about perfect corners, as PSQs with imperfect corners get an awful lot of love in my family!
Pingback: ‘Work In Progress’ Wednesday #wip – Gabry Road
Hi, I know this tutorial is quite old, but I’m hoping you can still answer my question! Am i correct to assume you could do the same but use larger size squares – say 6″ or 9″? I am VERY new to quilting, but want to make a quilt for my daughters. I love the pieced together look of this postage stamp quilt, but because i’d like to make it quite large, I’m worried i’ll run out of steam! THANKS!
By all means! Check out “Classic Squares” tutorial on the tutorial pages for a simple quilt made from 64 ten inch squares. Great thing about quilting, each process like this is do versatile!
thanks! it looks like it might just be easy enough for me to finish it! so if i used 6″ squares to start, would i maybe put 4 of them together to create the quilt block? would that work? or does that really matter?
That would work! Keep assembling sets of 4, then sew them together the same way. I think the step by step instruction in Classic Squares will help you a lot. Let me know how it goes!
Perfect, that makes sense. I’m sure I’ll have more questions once I get started and everything cut.
I am going to start cutting so I can join the swap in March…do you have any suggestions on how to organize the fabrics to cut the little squares? I have a few boxes of small scraps…I can stack 4 and cut the squares, but…any suggestions on how to organize to collect for the “sets” as in unique or matching so that each set has 100 squares?I am going to do 4 sets…how am I to be sure of no duplicates… that the 90th sq. is not already in there as the 15th sq? Or any other suggestions of organization for so many fabrics cut to so small a sq? Thanks so much!
That quilt is just amazing! Love your tutorial, very clear, simple steps — beautiful results! This is awesome, as are you. 🙂
Thank you Sarah! Your blog and IG feed inspire me!
Pingback: Ready to Swap? Just Thinking About It? Read On! | The Curious Quilter
Pingback: It’s All a Matter of Perspective | The Curious Quilter
Mary, I had lots of fun with this blog and I participated in two of your charm square swaps. Thank you for the time and effort you put into that. I still use your method of doing ‘random’ postage stamp squares. I could not do random so I carry around a little piece of paper with your instructions on it and sew ‘random’.
Pingback: Mod Postage Stamp Quilts – Sewing With Scraps
Pingback: Q & A’s – August 2020 PSQ Charm Swap | The Curious Quilter